Edge Runner


Recently published a high-speed anime platformer on Steam, with the help of my sister (artist) for designing and animating the player and levels. The game features complex gravity-bending physics with open levels and mechanics that encourage fast-paced gameplay.
The biggest challenge for me was developing the player which functions on a variety of mechanics during gameplay.

EDGE RUNNER
Rigidbody & Raycast Spline-Based Character Controller
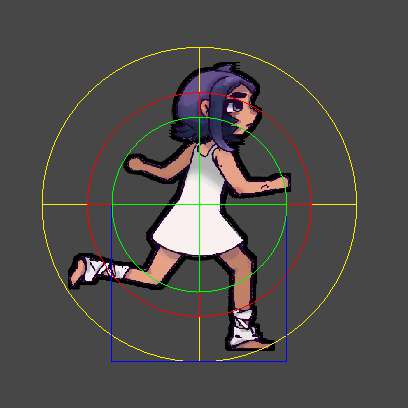
The player is surrounded by shapes that are used to detect different types of collisions.
First Revision
Initially, wall movement was handled by continuously casting a circle at the wall in order to get the surface normal, which is then used to angle the player correctly.
This method was inspired by the use of spheres for collision in Super Mario Galaxy, due to its round shape, we can prevent the side effects of gravity bending physics.
I found this to be much more effective than casting rays as used in the classic Sonic games due to the bugs that occur when standing on slanted ledges and pointy terrain.
I made a prototype of this in Unity to demonstrate this, as you can see the feet is not being positioned correctly when one of the floor sensors could not find a ground.
Final Revision
However, after replacing Unity’s physics engine and utilising splines with an extension script I made for Unity’s SpriteShape API, the process is a lot lighter now as we no longer need to make anymore detections after entering a wall since movement is simply achieved by moving the player along the wall spline with a percent value.
This method guarantees that the player will never fall off a wall even at extreme speeds, resulting in much more consistent physics. You can see this being stress tested in the clip.
Evenly-Spaced Spline Points
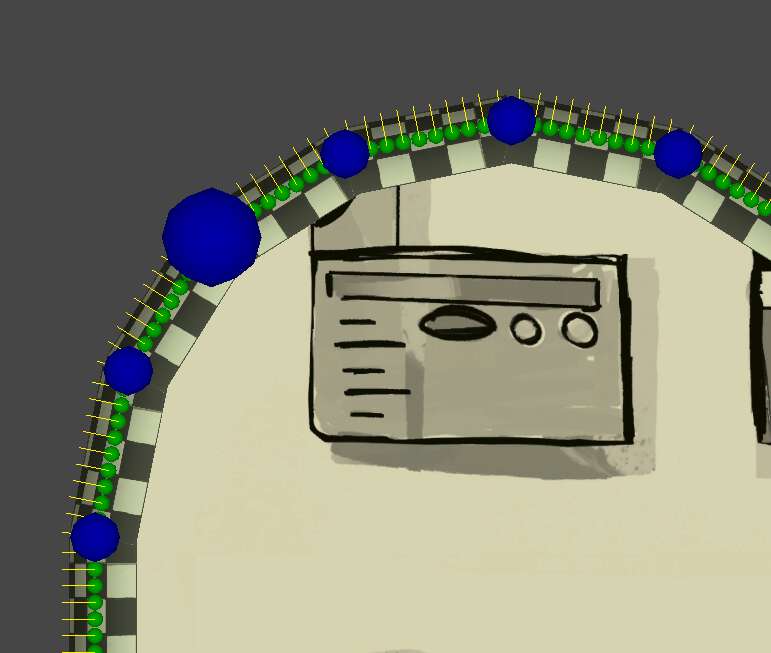
The spline is divided into evenly spaced points in order to achieve constant speed between points, which is also used for seamlessly attaching and detaching at nearest points when entering or exiting a wall.
The normal vector of each evenly spaced point is also calculated, which is used to angle the player correctly.
The yellow lines are the normals of the evenly spaced points (green), which are created from the wall spline points (blue).
The following code is used to calculate the position of all evenly spaced points based off the wall spline points.
public Vector2[] CalculateEvenlySpacedPoints()
{
	List evenlySpacedPoints = new List();

	// Setup with first evenly spaced point
	Vector2 prevPoint = splinePoints[0].pos;
	evenlySpacedPoints.Add(prevPoint);
	float dstSinceLastEvenPoint = 0;

	// loop for each segment
	for (int segmentIndex = 0; segmentIndex < splinePoints.Count; segmentIndex++)
	{
		// Calculate step value for the amount we will increment percent
		float segmentLength = splinePoints[segmentIndex].length;
		float step = 1f / Mathf.CeilToInt(segmentLength * EVENLY_SPACED_POINTS_RESOLUTION);
		float percent = 0f;

		// Iterate through the divisions to calculate evenly spaced points
		while (percent <= 1f)
		{
			// Progress thorugh spline by step and get disance from last evenly spaced point
			percent += step;
			Vector2 pointOnCurve = GetPoint(segmentIndex + percent);
			dstSinceLastEvenPoint += Vector2.Distance(prevPoint, pointOnCurve);

			// Add evenly spaced points between last evenly spaced point and our progress on spline
			while (dstSinceLastEvenPoint >= EVENLY_SPACED_POINTS_SPACING)
			{
				// Use overshot distance to estimate position of evenly spaced point, add it to the list and set it as last point
				float overshootDst = dstSinceLastEvenPoint - EVENLY_SPACED_POINTS_SPACING;
				Vector2 newEvenlySpacedPoint = pointOnCurve + (prevPoint - pointOnCurve).normalized * overshootDst;
				evenlySpacedPoints.Add(newEvenlySpacedPoint);

				prevPoint = newEvenlySpacedPoint;
				dstSinceLastEvenPoint = overshootDst;
			}

			prevPoint = pointOnCurve;
		}
	}

	return evenlySpacedPoints.ToArray();
} Vector2 CalculateEvenlySpacedPointNormal(int node)
{
int prevIndex = MathUtility.WrapIndex(evenlySpacedPoints.Count, node - 1);
int nextIndex = MathUtility.WrapIndex(evenlySpacedPoints.Count, node + 1);
Vector2 point = evenlySpacedPoints[node].pos;
Vector2 prevPoint = evenlySpacedPoints[prevIndex].pos;
Vector2 nextPoint = evenlySpacedPoints[nextIndex].pos;
float t = 0.5f; // position along spline segment
// Calculate the tangent using a finite difference approximation
Vector2 tangent = 0.5f * ((nextPoint - point) + (point - prevPoint)) / t;
// Get the normal vector by rotating the tangent vector by 90 degrees
Vector2 normal = new Vector2(-tangent.y, tangent.x).normalized;
// Transform normal with wall rotation
return (SpriteShapeController.transform.rotation * normal).normalized;
}All these wall calculations save a lot of performance as it’s only done once during initialisation, and we can access it from the wall the player enters.
Definition
Corners are defined by steep points that turn at a certain angle threshold. Outer corner points are automatically marked as “Edge points”.
Here we can see these corners updating in the editor, the blue are normal points and the red are edge points.
The following code is used to define edge points.
bool IsEdge(int node)
{
	Vector2 pos = Spline.GetPosition(node);
	Vector2 prevPos = Spline.GetPosition(MathUtility.WrapIndex(Spline.GetPointCount(), node - 1));
	Vector2 nextPos = Spline.GetPosition(MathUtility.WrapIndex(Spline.GetPointCount(), node + 1));

	Vector2 prevDir = (pos - prevPos).normalized;
	Vector2 nextDir = (nextPos - pos).normalized;

	return Vector2.Angle(prevDir, nextDir) >= EDGE_ANGLE_THRESHOLD && // Turns at an angle threshold
		Spline.GetTangentMode(node) == ShapeTangentMode.Linear && // Is a sharp corner
		Vector3.Cross(prevDir, nextDir).z < 0f; // Is an outer corner - next dir is to the left of prev dir
}
This allows the player to perform an “edge run” (which is when they drift off at a constant velocity, made possible by the CONTROL LOCK mechanic) whenever they reach their upcoming edge point.
A raycast is also shot from the edge point in the player's direction to find a close corner for the player to seamlessly cross over the small gap, if there is one.
By taking into account the distance the player will travel per frame, they will never overshoot their edge point, even during very slow or fast frame rates. You can see this system being stress tested here.
Wall jumping is achieved by reflecting the player’s velocity off the surface as well as initiating a CONTROL LOCK.
The reflected velocity is then normalised with some of the surface normal to bounce further away from the wall. This adjustment was made to more easily wall jump over spikes while wall running more effectively.
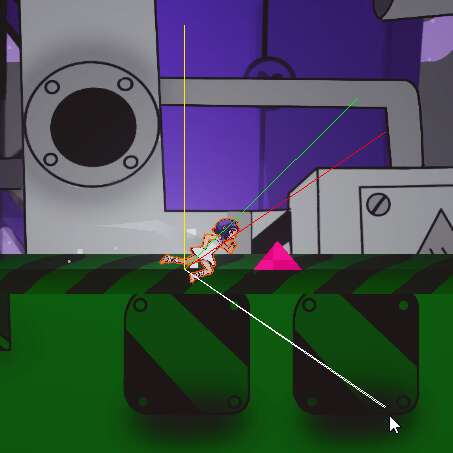
The while line is the direction the player enters the wall (in the case of wallrunning, this is the direction of the mouse to the player), the red is the reflected direction, and the green is the reflected trajectory with some of the surface normal (yellow). As you can see the final green trajectory points the player further away from the wall, in turn making it easier to avoid nearby spikes.
Secret Ricochet Mechanic
One secret mechanic I really wanted to include was the ability to ricochet in tunnels. Like external forces, doing so allows you to gain instant momentum by exceeding the normal speed capacity.
However, this did not work well with the adjustment added as it causes the player to eventually ricochet in place.
To overcome this, I excluded the normal vector if the player was ricocheting, which is defined by if they wall jump without pressing the dash input during control lock. This was the result, on the left is ricocheting with the adjustment and on the right is without:
void EnterWallJump(RaycastHit2D wallHit)
{
	SetDirection(Vector2.Reflect(Dir, wallHit.normal));
	// Is ricocheting - wall jumped without input
	ricocheting = State == States.WallJump && !dashInput;
	if (!ricocheting)
	{
		// Normal wall jump, adjust direction with some of surface normal
		SetDirection((Dir + wallHit.normal * WALL_JUMP_ADJUSTMENT_FACTOR).normalized);
		ricochetCount = 0;
	}
	else
	{
		// Ricochet, don't add adjustment, increment count and add score
		ricochetCount++;

		gameManager.SetScore(GameManager.PointTypes.Ricochet, CenterPos,
			multiplier: Mathf.Clamp(ricochetCount, 1, ricochetPointMultiplierMax));
	}

	ControlLock(ricocheting ? controlLockDistanceRicochet : controlLockDistanceWallJump);
	StartFalling(ricocheting ? fallingTimeRicochet : fallingTimeWallJump);
	ModifySpeed(ricocheting ? speedIncRicochet : speedIncWallJump, exceed: ricocheting);

	SetState(States.WallJump);

	// Play particle & sound effect
	wallJumpPFX.Play();
	audioManager.PlaySound(SFX.WallJump,
		Mathf.Clamp(walljumpPitchMin + (wallJumpPitchStep * ricochetCount),
		walljumpPitchMin, walljumpPitchMax));
}The control lock distance mechanic is used to prevent directional input from influencing the player’s direction until they reach a certain amount of distance from lock point.
This system was made flexible for use and is what ties all the other mechanics together such as edge running, wall jumping, hitting a launch pad, and assist pushing the player to a nearby ground.
The lines show the path from the lock point to the unlock point, and the number next to the player show the distance remaining until they reach the unlock point. As you can see, this can also be interrupted by player input or environment blocking in the way (ground, wall).
The following code is used to manage control locks. Control locks are updated to see if the distance has been reached and then unlocked. Control locks are also abruptly unlocked when transitioning into new states while exiting the last one.
void ControlLock(float distance)
{
	// Initate lock
	controlLockDistance = distance;
	controlLockPoint = Pos;
}

void UpdateControlLock()
{
	if (!ControlLockActive)
		return;

	// Move control lock point with motion object velocity if there is one
	var externalVelocity = Vector2.zero;
	if (movingWall)
		externalVelocity += movingWall.Velocity * Time.deltaTime;
	if (rotatingWall)
		externalVelocity += rotatingWall.Velocity(controlLockPoint) * Time.deltaTime;
	controlLockPoint += externalVelocity;

	if (Vector2.Distance(controlLockPoint, Pos) >= controlLockDistance - 0.0001f)
	{
		// Distance has been reached, unlock control
		ControlUnlock();
	}
}

void ControlUnlock()
{
	// Exit last state
	if (State == States.EdgeRun)
	{
		ExitWallRun();
		transform.position = CenterPosUnderInnerCircle;
	}
	else if (State == States.WallJump)
	{
		ExitWallJump();
	}

	// Exit others
	if (launchPad)
	{
		launchPad = null;
	}
	if (assistingLand)
	{
		assistingLand = false;
	}

	// Reset
	controlLockDistance = 0;
}
The system was inspired by the control lock timer used in the classic Sonic games, except it instead uses distance.
In older revisions, the control lock timer method was used, however it wasn’t suitable as the travelled distance during control locks were inconsistent due to speed always changing, which conflicted with the level design.
Other Systems
I used Cinemachine to follow a “CameraTarget” object, which is set not only based on the player’s position but also the mouse position. The player’s direction is also gradually added with a “influence percent” that increases while wallrunning to show what’s ahead.
We’re also smoothly changing the dead zone of the virtual camera component based on the player’s state, allowing us to tweak the feel of each, thus making the camera more dynamic.
The target’s position is limited by a threshold box surrounding the player so the camera never loses them. The bounds is scaled by the screen ratio so there’s more horizontal freedom.
The camera target is the blue, you can see it turn cyan when it's clamped by the threshold box (red). You can also see the dead zone box (yellow) changing smoothly.
The following code shows the logic behind gaining the speed of motion objects on exit. We are using a “applyPassengerExitForce” flag as we want to gain speed from certain motion objects.
using UnityEngine;
using Cinemachine;

public class CameraTarget : MonoBehaviour
{
	readonly Vector2 SCREEN_RATIO = new(1f, 0.5625f); // Aspect 16:9

	[SerializeField] float threshold;

	[Header("Player Direction")]
	[SerializeField] float playerDirInfluenceAmount;
	[SerializeField] float playerDirInfluenceAcc;
	[SerializeField] float playereDirInfluenceDec;
	float playerDirInfluencePercent;

	[SerializeField] float playerDirSmoothTime;
	Vector2 playerDirSmooth;
	Vector2 playerDirSmoothCurrentVelocity;

	[Header("Dead Zone")]
	[SerializeField, Range(0f, 1f)] float deadZoneOnWall;
	[SerializeField, Range(0f, 1f)] float deadZoneAirborne;
	[SerializeField, Range(0f, 1f)] float deadZoneOnGround;

	[SerializeField] float deadZoneSmoothTime;
	float deadZone;
	float deadZoneSmooth;
	float deadZoneSmoothCurrentVelocity;

	[Header("Cam Setup")]
	public Camera cam;
	[SerializeField] CinemachineVirtualCamera virtualCam;
	CinemachineFramingTransposer framingTransposer;

	#region Gizmos
	bool targetPosClamped;
	#endregion

	public bool CanMove { get; set; }

	Player player;

	public static CameraTarget Instance { get; private set; }

	private void Awake()
	{
		Instance = this;
	}

	private void Start()
	{
		player = Player.Instance;
		transform.position = player.CenterPos;

		player.OnStateChanged += UpdateDeadZone;
		player.OnGroundedChanged += UpdateDeadZone;
	}

	private void Update()
	{
		if (CanMove)
		{
			// Get mid position between player and mouse
			Vector2 playerPos = player.CenterPos;
			Vector2 mousePos = cam.ScreenToWorldPoint(Input.mousePosition);
			Vector2 targetPos = (playerPos + mousePos) / 2f;

			// Calculate and apply player direction values
			playerDirInfluencePercent = Mathf.Clamp01(playerDirInfluencePercent
				+ (player.WallOrEdgeRunning ? playerDirInfluenceAcc : -playereDirInfluenceDec)
				* Time.unscaledDeltaTime);
			playerDirSmooth = Vector2.SmoothDamp(playerDirSmooth, player.Dir,
				ref playerDirSmoothCurrentVelocity, playerDirSmoothTime);
			targetPos += playerDirSmooth * playerDirInfluenceAmount * playerDirInfluencePercent * threshold * SCREEN_RATIO;

			// Bound target by threshold and screen ratio
			Vector2 unclampedTargetPos = targetPos;
			targetPos.x = Mathf.Clamp(targetPos.x
				(-threshold * SCREEN_RATIO.x) + playerPos.x, (threshold * SCREEN_RATIO.x) + playerPos.x);
			targetPos.y = Mathf.Clamp(targetPos.y,
				(-threshold * SCREEN_RATIO.y) + playerPos.y, (threshold * SCREEN_RATIO.y) + playerPos.y);
			targetPosClamped = targetPos != unclampedTargetPos;

			// Dead zone of virtual cam
			deadZoneSmooth = Mathf.SmoothDamp(deadZoneSmooth, deadZone, ref deadZoneSmoothCurrentVelocity, deadZoneSmoothTime);
			framingTransposer.m_DeadZoneWidth = deadZoneSmooth * SCREEN_RATIO.y;
			framingTransposer.m_DeadZoneHeight = deadZoneSmooth * SCREEN_RATIO.x;

			transform.position = targetPos;
		}
	}

	public void UpdateDeadZone()
	{
		switch (player.State)
		{
			case Player.States.Normal:
				deadZone = player.Grounded ? deadZoneOnGround : deadZoneAirborne;
				break;
			case Player.States.WallRun:
			case Player.States.EdgeRun:
				deadZone = deadZoneOnWall;
				break;
			case Player.States.WallJump:
			case Player.States.Dash:
				deadZone = deadZoneAirborne;
				break;
		}
	}

	private void OnValidate()
	{
		framingTransposer = virtualCam.GetCinemachineComponent();
	}

	private void OnDrawGizmosSelected()
	{
		// Threshold
		Vector2 thresholdCenter = player ? player.CenterPos : cam.transform.position;
		Gizmos.color = Color.red;
		Gizmos.DrawWireCube(thresholdCenter, new Vector2(threshold * 2f * SCREEN_RATIO.x, threshold * 2f * SCREEN_RATIO.y));

		// Virtual cam dead zone
		Gizmos.color = new Color(255, 255, 0, 0.5f);
		Gizmos.DrawCube((Vector2)cam.transform.position, new Vector2(
			framingTransposer.m_DeadZoneWidth * (1f / SCREEN_RATIO.y),
			framingTransposer.m_DeadZoneHeight * (1f / SCREEN_RATIO.x))
			* virtualCam.m_Lens.OrthographicSize * 2);

		// Target
		Gizmos.color = targetPosClamped ? Color.cyan : Color.blue;
		Gizmos.DrawCube((Vector2)transform.position, Vector2.one * 1.5f);
	}
} The moving and rotating platforms, known as “motion wall”, give more opportunity for the player to manoeuvre around the levels with exceeding speeds.
With the first revision of the player script, we had to add the velocity of the rotating or moving platform to the player’s move velocity so that they move with the motion wall they are on and not fall off. However, with the spline-based solution we implemented, our problem is automatically solved since the wall spline is already rotating or moving and we can still just use the spline points to position the player along the wall correctly.
And to angle the player correctly with rotating platforms, we need the normal vector of the evenly-spaced spline points to rotate with the wall too. This is done by only refreshing the spline point normals of the rotating wall the player is currently on.
As you can see, once the player enters a wall, the normals turn red and spike out as they update correctly relative to the rotation of the wall.
The player gains the momentum of the motion wall on exit.
The following code shows the logic behind gaining the speed of motion walls on exit. We are using a “applyPassengerExitForce” flag as we want to gain speed from certain motion walls.
void ExitWall(bool removeMotionObject = true)
{
	wall = null;

	if (rotatingWall)
	{
		KeepMotionObjectSpeed(ref rotatingWall, removeMotionObject);
	}
	if (movingWall)
	{
		KeepMotionObjectSpeed(ref movingWall, removeMotionObject);
	}
}

void KeepMotionWallSpeed(ref T motionObject, bool removeObject) where T : MotionObject
{
		// Apply motion walls's momentum on exit if we were wall running or edge running
	if (WallOrEdgeRunning && motionObject.applyPassengerExitForce)
	{
		ModifySpeed(TotalVelocity.magnitude, sum: false, exceed: true);
	}
		// Remove motion object
	if(removeObject)
	{
		motionObject.SetPassengerActive(false);
		motionObject = null;
	}
}
Big Optimisation with the Profiler
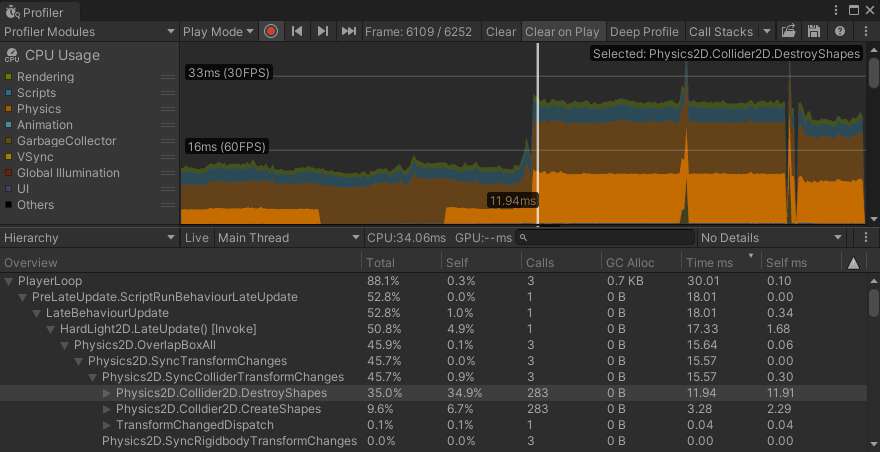
A problem I encountered was low performance in scenes where a lot of motion objects were present. Using the profiler, I identified that most of the processing power was being spent on the “Physics2D.SyncCollider2DTransformChanges” event, responsible for updating colliders of objects with a changing transform.
The frame being shown was the time we loaded a new “chunk”. You see, to improve performance I broke the level down into chunks that load when detected by the camera box. However, in this case, the second chunk loads in more motion objects, which explains the doubling of processing power from this frame.
The event took up a whopping 45.7% of frame time, due to 283 calls being made to its functions.
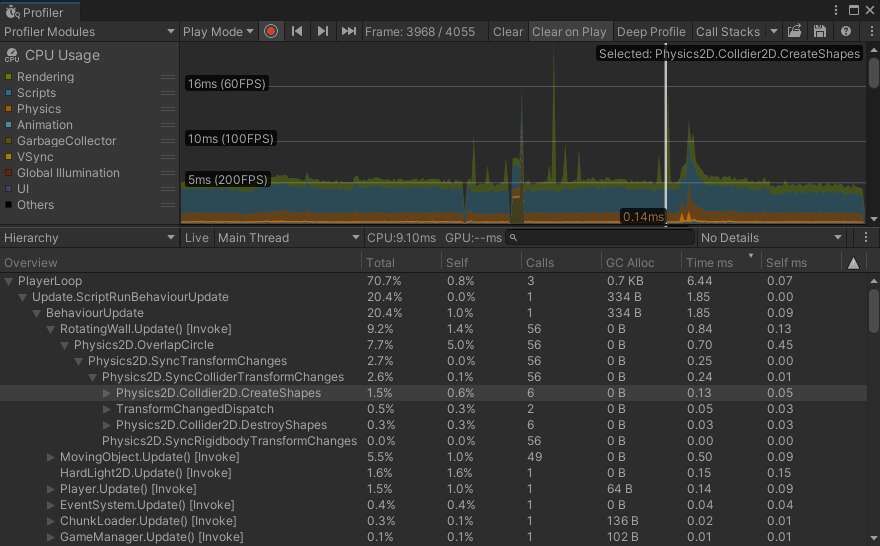
I implemented a solution where motion objects are surrounded by a circle that detects for the camera box so that we can only apply calculated rotation or movement to the transform when it’s in view. This significantly reduced the event’s impact to 2.6% of frame time, with only 6 function calls. Processing power is now distributed well and never doubles when loading the 2nd chunk.
Sound
I made the tracks for room 1 (Cryo City) and room 2 (Factory Falls) using FL Studio.